Configuration guide: Behnke Station and camera in different IP address range than IP video software
1. Configuring the IP video software
-
Start the configuration of the IP video software and enter the telephone number that the Behnke Station is dialing when a button is pressed in the "Workstation-ID" field and then click on "Save configuration". The window with the video will only appear if the Behnke station is dialing this exact number. The spelling of the number must correspond exactly to the number stored in the Behnke Station. In the fields "Server IP-Address and Port" please enter your Behnke Station's IP address and port "8255". Then enable the option "Use server" and click "Save configuration". After a few seconds you should see a green bar next to "Use server". This bar indicates that the software successfully established a connection to your Behnke Station.
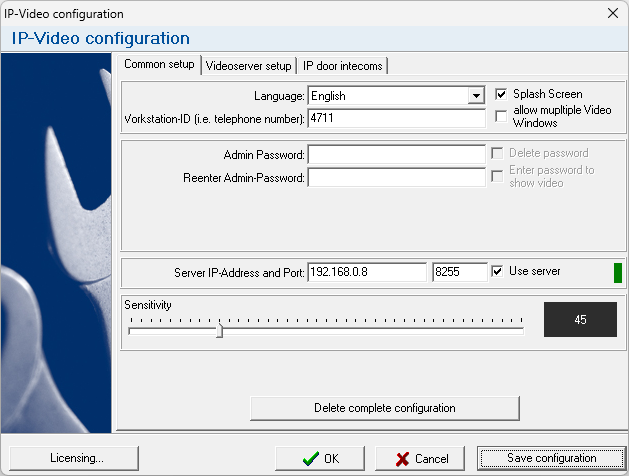
NOTE:If you do not know the number for the "Workstation-ID", please access the web interface of the Behnke Station. There you will find the phone numbers to be dialed by the Behnke Station in the menu on the left under "Buttons". If you are using multiple Behnke Stations, it doesn't matter which Behnke Station's IP address you enter in the "Server IP address and port" field, as long as the Behnke Stations are all in the same IP address range. If the bar next to "Use server" remains red, please check whether the software can establish a TCP connection to the Behnke Station on port "8255". Your routing or firewall rules may have to be adjusted. -
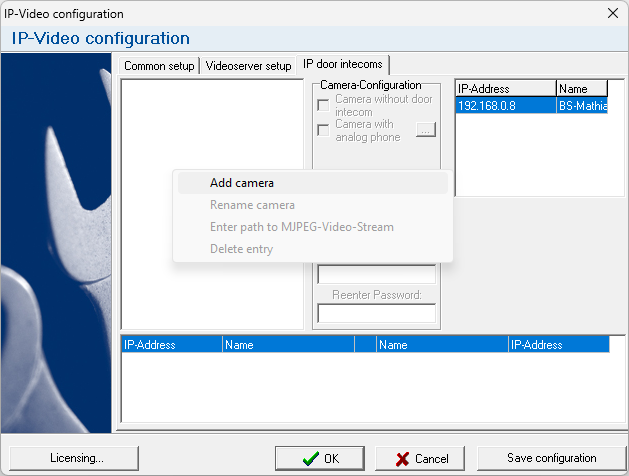
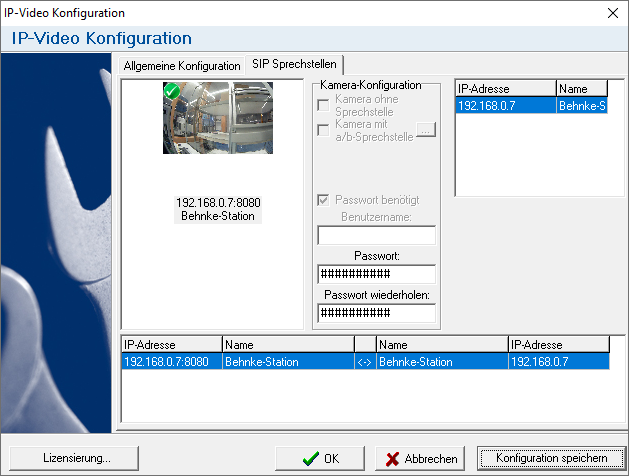
Then switch to the "IP door intercoms" tab. The IP address of the Behnke Station(s) should be listed here in the box on the right-hand side. The associated camera has to be added manually. Right-click in the box on the left to open the context menu. Select "Add Camera".
-
In the window that pops up, enter an arbitrary "Name" for the camera. Enter the "IP address" of your camera. In the "Port" field, enter the port number of the camera through which the video can be accessed. Select your camera type from the drop-down box. Then click "OK".
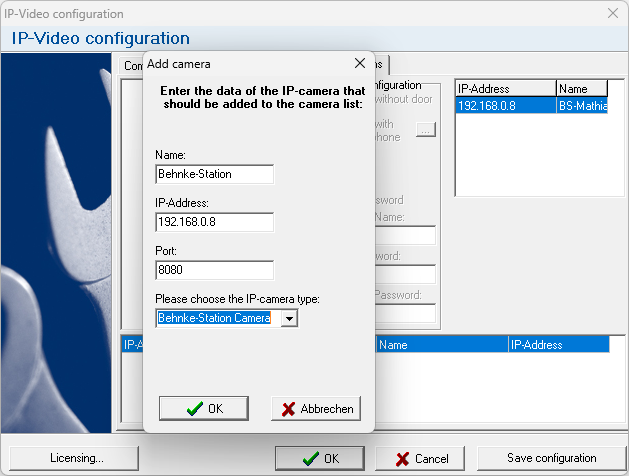
NOTE:You have to choose the correct camera type for your camera. If you select the wrong type, the video cannot be retrieved. Via the following link you will get to an overview of the possible camera types. There you can use the MAC address of your camera to determine the correct camera type and port number:
| Camera type | Port | MAC address | | --------------------- | ---- | ----------------------------------------------------------- | | Behnke-Station Camera | 8080 | only for newer Behnke Stations with system camera, i.e. with USB camera or with an IP camera integrated as a system camera (see the web interface of the Behnke station > Network > IP camera > "integration as") | | AXIS®/B-Smart Camera | 80 | AC:CC:8E:XX:XX:XX
00:40:8C:XX:XX:XX
B8:A4:4F:XX:XX:XX | | Behnke IP-Camera | 80 | 00:50:C2:XX:XX:XX | | Behnke Smart-Camera | 80 | F8:1C:E5:FX:XX:XX | -
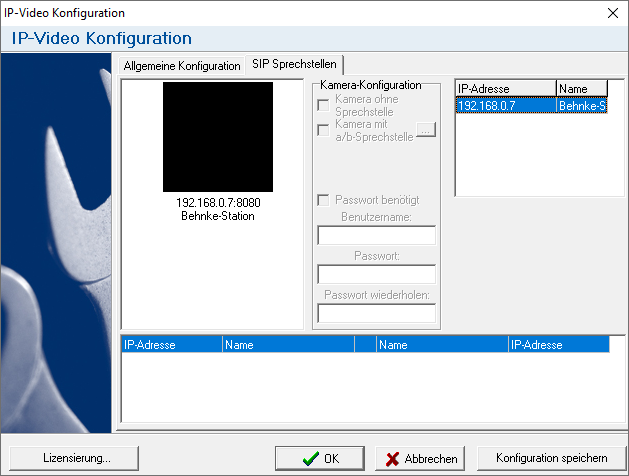
The entry for the camera should now be visible in the box on the left (black square with the IP address of the camera).
-
Then left-click on the camera and enter "Username" and "Password" to the right to access the camera. Then select the Behnke Station in the box on the right and click "Save Configuration" at the bottom. The camera will then be assigned to the Behnke Station and a corresponding entry will appear in the box below. After a few seconds, the camera preview should be displayed.


Basic configuration is now complete and the configuration window may be closed. A window with the video should now open automatically when a call is triggered at the Behnke Station. The window is displayed for the duration of the call. After hanging up, the window will close again.